Showing posts with label Country Life. Show all posts

Feb 11, 2011

Episode 85: two cute Cards Using Country Life & Imagine More

Hey there!

Today i am doing a bit of a two in one. I had this idea for 2 cute and simple cards so instead of doing two videos i thought tiat I would just do them both in one. since they were quick and fast, and pretty much go together.


Details:
The Countryside was cut from Country Life at 3 Inches
The pitcher was cut from Country Life at 3.75 inches.
Both Cards are A2 Size
PK 660 Laughy  Taffy Face Assortment
Scrappy Moms Stamps used:
" You  are my Sunshine" Amusing Animals
"Just a Note" The Charmed Life


I hope you enjoy this video!


Shop Lettering Delights

Feb 2, 2011

Challenge # 16: Valentine's Day project (not a card) with VIDEO

Happy Wednesday!

It's the start of a new month which means NEW CHALLENGEs and a NEW prize.
Lately it seems everyone has been cranking out Valentine's Themed projects, but I have been seeing alot of cards.


This week's challenge is : Create a Valentine's Day Theme Project, as long as it's not a card.

The February Challenge prize is:
Spring Holiday Cards Cricut Cartridge!!


This is a great chance to catch up with scrapbooking, work on treats for school aged children, as well as decorate mailboxes. Those are some ideas to name a few, but the possibilities are endless.

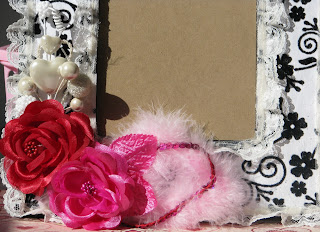
The Guest Designer for this week is Maria M. from Maria Elena World She created this super adorable altered wooden frame. I absolutely adore the color combination as well as the cluster of flowers.


Amanda
Created this super cute altered mailbox. You can pick these little cuties up at target for a dollar and they are just so fun to decorate. This would make such a great gift for a school aged child to take to school. Just decorate and fill with treats!


Ivette
 Created this super romantic altered wooden frame as well. I love her choice of pattern paper and they way she incorporated the  adhesive rhinestone with the ribbon :) It' came out so perfect.

Elsa

Created this adorable Mailbox from a big shot die. And isn't it to die for :)  I can just imagine a little kid taking this to school and having it stuffed full of letters from their valentines.


for my project I went ahead and a scrapbook page layout.
I went ahead and tried to create a punny themed scrapbook page but i wanted it to be adult and more sophisticated. I decided to use the sentimentals cricut cartridge for that reason.


Dec 21, 2010

Contest & Scrappy Moms Sneak Peak #3

Hey friends,

This is just a reminder that you can enter to win a FREE Set of Scrappy MOms Stamps by Emailing Scrappymoms-stamps@gmaik.comand enter your guesses on Which Design Team member designed which stamp setiment. The person with the most correct answers will win a scrappy moms stamp set of their choice. It's simple!!  Each Design Team member had a hand in designing the sentiments
And just for stopping by my blog, I'll give you a hint, * I designed 3 sentiments* I will post another picture of the stamps at the bottom of this post.

 DESIGN TEAM MEMBERS


here is another card I designed for today using country life.


Dec 18, 2010

***giveaway closed***Homemade Christmas Blog Hop

Hey there friends,

Welcome to the homemade Christmas Blog Hop!! Today's Blog hop is all about homemade christmas ideas for gifts, cards, and decor.

Today I will be showing you a little bit of each! It is soo easy to create awesome handmade gifts for christmas using your cricut.

Since I Just got my imagine yesterday, I sat down and easily and quickly whipped up card sets for gift giving. My family and friends love getting homemade cards.

here are the set of 4 that I made

 For this card I used imagine more border feature as well as Country Life.
 The pattern paper, solid green and kite image are all from imagine more.
This card I created using pattern paper from Imagine More and the clothes hanging on a line is from Country life.
The pattern paper and cardstock are all from Papertrey ink, I used my imagine and Simply charmed to match the Papertrey ink RGB codes .


Next I made a really cute ornament
 This is a plastic ornament that I purchased from Michaels on Black Friday. Inside of it is an idea that I got from my fellow Scrappy Moms design team Member Liz From Liz's Paper Loft. I sprayed the inside with Dazzling Diamonds Glimmer mist the photo looks a little foggy but the actual orgnament has a sheen of glitter, its so pretty. Inside is a cut from Winter Frolic of 2 birds in a cage, and that is cut at I believe 2.75 inches. and is mounted on acetate. If you want a full tutorial for this please check out liz's site, she has a great video. I tied a bow with Some stampin up Real Red swiss dot saddle stich ribbon, added a black button and tied some timeless twine. I added the ribbon onto the ornamanet with my hot glue gun

I created a box using some light blue cardstock, 11 inch square  scored on all 4 sides at 3.5 inches.

I also created a top and added some fun 2.5 inch wire ribbon.

Next I created a snowman candy bar wrapper. This is a free printable design by Laurie Furnell. She has all the instructions for it on her site.  It is a very easy sewing machine project. If you know how to make a straight-ish stitch you can make this

Finally to wrap everything up I used a Kraft Gift bag to decorate it. the cut is from Christmas Cartridge cut at 2.5 inches (i think)


I hope you really enjoy this project I created and it gives you some ideas for some homemade gifts for christmas


I have some blog candy to offer. Make sure you leave a comment on this post in order to qualify to win an IROCK!!!!! I will be choosing the winner via random.org on dec 22, so you have until dec 21 to enter for a chance to win


Next you are on your way to ELSA


Trish, http://www.techniquesbytrish.blogspot.com